Sunday 30 January 2011

Froggity Blog hop

Hi all
And welcome if you are here via the Banana Frog blog hop, but you're also welcome, ofcourse, if you have just arrived here in passing! If you'd like to join in the hop it's not too late just hop on over to the Lilypad and start at the top of the list I know you will find loads of inspiration along the way from the oh so talented froglets!

At this point I am adding in that this post is late (sorry) as I have holiday brain and have gained a day somehow .... hmm margueritas?? I am also now saying a HUGE sorry as now this post is publishred all my photos seemed to have disappeared from my post!!! I'll post the lovely photos (such a shame I love this project!)when I get home next week as I don't have them with me :( I also prepared this post before I flew off from blighty and before the winter theme for the hop was decided ...oops! Going well so far LOL ok enough extra waffle let's move on :)

So here's my project for today, with valentines on the way I thought I would share some Lurve!


Love Tokens


The ingredients
This project uses the aptly named It's all about love stamp set and the DeLouisville tadpole set. I have also used some Bubblegum Canford card, white card, colorbox archival ink in Firebird, red devil and dark cherry, Embossing ink, cosmic shimmer ruby blush blaze embossing powder and a pink doodle pen.


Stamp the large heart from the set on to some white card and draw a line around it larger than the image, cutting it out to create a template for the top and bottom of the box.


Draw around the template onto the pink card and once again draw around the image creating a margin to snip so that it can be folded over and create the anchor for the sides of the box.


Fold up the snipped sections and adhere a strip of card around the hearts. Before adhering the strip around the top of the box, stamp it with the small dangling hearts fronm the samp set. NB you need to make the top heart the merest fraction bigger than the bottom so the lid fits on the box snuggly


Stamp the large heart onto some white card and cut out following the scallops, then stamp the large heart again on to some pink card this time cutting just inside the line of the inside heart to create a mat for the box top.


Emboss the smaller heart onto some white card and cut it out to create an embellishment for the centre of the box top.


The box could contain any treasure for your loved one to enjoy but I think these love tokens are fun, personal and in expensive as they can carry such promises as breakfast in bed and a day of sport on the telly! Stamp the large heart onto some white card and cut out following the scallops. Use the Tadpole set of DeLouisville to write the word and doodle around the heart with a pink pen. The 'claim' for the token can be written on the back.


Add some tissue paper in the bottom of the box, maybe some chocoates and a few love tokens and enjoy that specal squidgy feeling when you give it to your loved one and they admire the effort you've made to say 'I love you'

I hope you feel inspired, and talking of inspiration your next stop is the talented
Lory and I know she will be better organised than me :)
Enjoy the rest of the hop and thanks for stopping by my little section of the Lilypad :)
I hope you're well and happy and until soon Happy Crafting
Love
M x

Tuesday 25 January 2011

A Froggy new year!

Hi all
Today I am sharing this


on the Banana Frog blog, a fun firework party wih step by step instructions on the Lily pad so why not hop on over :)

I hope you're well and happy, see you soon and until then Happy Crafting

Love
M x

Friday 21 January 2011

Simple Sparkle Things

Hi all
Just a quickie to drop of todays Simple Things project for this month. The word is Belief and I couldn't resist sharing my sparkle created by my 5 year old niece Megan!


You can read the full story on the IACW blog, I think I may have the youngest DT member ever LOL

I hope you're well and happy and may all your wishes come true (go on read the post LOL)

Happy Crafting
Love
M x

Sunday 16 January 2011

Tropical collage

Hi all, I have an offering over at It's a Creative world today


A bright and breezy tropical collage to help chase away those winter blues :) Why not hop on over to the IACW blog and read the full post .... enjoy :)

Short and sweet I know but I'll be back soonad may even blog from my beloved Mexico where I will be landing today ... Yippee!!

I hope you're all well and happy and as ever until soon Happy Crafting!
Love
M x

Tuesday 11 January 2011

Soul mates and fun with Glitz Designs

Hi all and Happy New Year and what better way to start my creative blog posts for 2011 than with fabulous Glitz products! After all the recent festivities I am now looking forward to going on holiday next week to my beloved Mexico so I decided to look at last year’s photos to get me in the mood. While looking through the many files I came across a series of photos of me and hubby, part of our holiday tradition holding the camera aloft everywhere we visit, and I had to smile. People have always told us we look alike and one of my dear friends calls us split aparts, meaning two halves of one whole, and never have I really seen this until these photos I was amazed to see we are pulling exactly the same facial expressions, well they just had to be scrapped!


And what better papers and embellishments to use than Glitz Designs so here’s my list!
Glitz Designs Hoopla paper; Floral
Glitz Designs Love nest paper; Floral
Glitz Designs Hoopla peek-a-boos
Glitz Designs Love nest peek-a-boos
Glitz Designs Hoopla cardstock stickers; titles
Glitz Designs hoopla rub ons
Glitz Designs Love nest glitzers
Glitz Designs vintage whatnots
Glitz Designs teeny alphas green


I started by printing all 3 photos at 6’’ x 4’’ and then ripping away the excess from 2 of the photos and distressing the edges of the main photo. I added some rub ons to the edge of the main photo to fill in the dark space, the Glitz rub ons are so super strong they are great for adding on to your photos to add extra interest.


I added some of the torn Hoopla floral paper in strips and adhered my photos in place adding in the map peek-a-boo from the love nest collection and then framing the 2 top photos with peek a boos from the Hoopla collection. I think these peek-a-boos are a genius idea for adding layers to your work without too much bulk.


On the back of the main photo I adhered a casing of foam tape to act as the housing for my vintage what not journaling card and added a hoopla title sticker to the edge of it to peek out as a pull tab.


Adding a bit of ribbon to the end of the pull tab makes the hidden journaling more inviting to pull out and some ribbon on the other side of the photo ties the layout together.


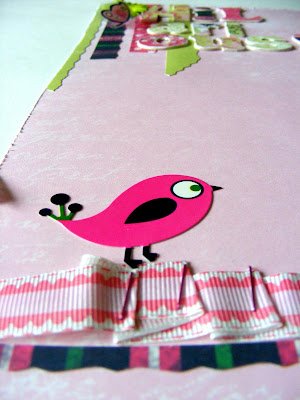
The finishing touches were the gorgeous Glitz Designs teeny alphas, a number 2 from the hoopla title stickers and a little bird from the love nest glitzers for a little bit of bling, love those glitzers! And that’s it a simple layout with hidden journaling and added acetate interest from those peek-a-boos with a map including Mexico to boot!

And while we’re still in the post festivities mood and in the spirit of using up those left overs I thought I would do a fun and bright layout using the Maya range launched this time last year to make way for the new Glitzy goodness coming (take a peek on the Glitz website for the ’coming soon’ gorgeousness!)


These photos of my nieces make me laugh so much they really capture their cheeky spirit. For this layout I have used
Glitz Designs Maya complete paper collection
Glitz Designs Maya cardstock accent stickers
Glitz Designs Maya rub ons
Glitz Designs teeny alphas in pink


I have used loads of scraps of papers (you know that pile of bits we all keep because we can’t bare to throw them out!) to create the pattern on this layout and covered some naked chipboard alphas in scraps too for the title. The accent stickers do most of the rest of the work on the layout alongside the rub ons added to acetate to make the butterfly embellishments fly. The journalling is done in the style of an advert on tv at the moment and the teeny alphas are perfect for the punchline.


The Maya bird adds the whimsy on top of the stapled ribbon and layering up the scraps and alphas creates dimension. A happy layout that really makes me smile!

Thanks for stopping by and letting me share some Glitzy goodness with you today. I hope you’re all well and happy and until soon, as ever, Happy Crafting
Love
M x

Tuesday 4 January 2011

HAPPY NEW YEAR!!!

Happy New Year to you all, I hope 2011 is a great year for everybody! Ialso hope you had a great festive season.Normal service is gradually resuming in my household and the creative grey cells starting to wake up again I just hope they find my mojo LOL.

I just wanted to post a greeting to you all today and I'll be back soon for a chat properly and some crafty sharing :)

I hope you're well and happyand until soon as ever Happy Crafting

Love
M x