
I'm back with part two of the importing files into your CraftArtist 2 Professional tutorial (from now on known as CAP) This time we will look at PDFs (Click here if you missed part one)
There are 3 types of files that can be converted, all easy!
1.
An ordinary PDF generated say for a magazine page or a scan that’s been turned
into a PDF or sometimes free instruction sheets that are found on the internet
can be pulled apart very easily.

 When the pop
out box appears go to the drop down menu on the bottom right and select PDF
files (this box defaults to search for Craft Artist projects) Now you will be
able to search your computer files and folders for all the PDF files you have. Select
the file you want and click open
When the pop
out box appears go to the drop down menu on the bottom right and select PDF
files (this box defaults to search for Craft Artist projects) Now you will be
able to search your computer files and folders for all the PDF files you have. Select
the file you want and click open
 this will now import the file into a new
work space.
this will now import the file into a new
work space.
 You will now be able to select the different elements of the document
and literally pull it apart.
You will now be able to select the different elements of the document
and literally pull it apart.

2.
A PDF from a craft CD. These behave slightly
differently
From
the start up wizard click open at the bottom of the middle column
And save elements to your own digi kit (subject to copyright of the material of course!)
To create your own digi kit use the digikit creator found in the tools drop down menu, further instructions for this can be found in part one of this post (click here)
As
in the first example From the start up wizard click open at the bottom of the
middle column, when the pop out box appears go to the drop down menu on the
bottom right and select PDF files (this box defaults to search for Craft Artist
projects)
 Now search your computer for the craft CD location which will be in your
DVD drive and should have its name showing. Click to open and then search for
the folder(s) that hold the images. (These folders can be called different
things and also can be sub folders in other folders all CDs vary so search
around for them) Open these when you have found them and then click on the
PDF you want to add to your workspace.
Now search your computer for the craft CD location which will be in your
DVD drive and should have its name showing. Click to open and then search for
the folder(s) that hold the images. (These folders can be called different
things and also can be sub folders in other folders all CDs vary so search
around for them) Open these when you have found them and then click on the
PDF you want to add to your workspace.
Select the file you want and click open, this will now import the file into a new project.

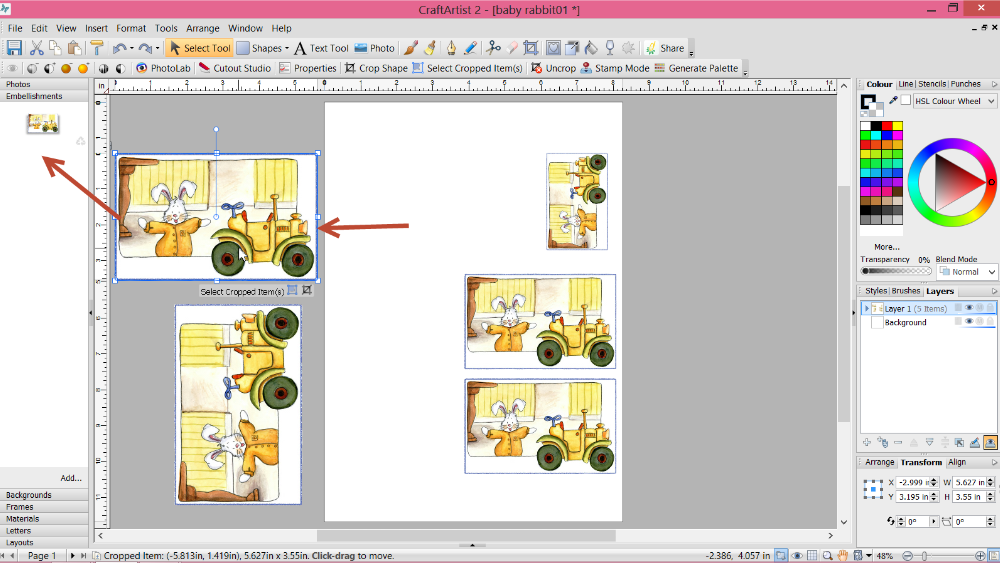
A lot of craft PDF pages have multiple
images on them and we want to get to the individual images so we need
to do a little extra work.
 When
the ‘page’ is added to your work space we want to be able to cut out the images
so for this we use the cut out studio while the whole page is selected.
When
the ‘page’ is added to your work space we want to be able to cut out the images
so for this we use the cut out studio while the whole page is selected.

 You will find that the images are still joined. This is simply solved by making sure
the images are selected with the blue box around them and then go to the
scissor tool
You will find that the images are still joined. This is simply solved by making sure
the images are selected with the blue box around them and then go to the
scissor tool
 Drag this a little way into the blue box on an empty space
(avoiding cutting into images) Unlike usual when you have to cut from outside
an object to outside an object to cut it you only need to make a small ‘snip’
in this instance
Drag this a little way into the blue box on an empty space
(avoiding cutting into images) Unlike usual when you have to cut from outside
an object to outside an object to cut it you only need to make a small ‘snip’
in this instance
 Click select to de activate the scissors then click on the
grey area around the work space to de select the image and now when you click
on one of the images you should find that they are all separated. These again can then be saved in the relevant sections of your kit and saved using the digikit creator (again see part one of this tutorial by clicking here)
Click select to de activate the scissors then click on the
grey area around the work space to de select the image and now when you click
on one of the images you should find that they are all separated. These again can then be saved in the relevant sections of your kit and saved using the digikit creator (again see part one of this tutorial by clicking here)
Select the file you want and click open, this will now import the file into a new project.
If
the images are on a white background you can work with a large brush size and
100% grow tolerance and simply drag the brush into the page and you will see a
dotted line appear around the images, the background is now cut away. If the
images are on a patterned background you may find a smaller brush size easier
and the reduction of the grow tolerance – I liken this to fingers that reach
out and grab like for like colours to cut away so a smaller grow tolerance means
a smaller grab and also click drag and release the brush a little at a time so
it doesn’t grab too much at one time, play around with the settings for each
individual project and you’ll get the hang of it in no time ;) Once
you are happy with the cut out click ok and the images return to your workspace
3.
The final PDF type is again from a craft CD and it just involves an extra step!
Import
your PDF as above (start up wizard then open then select PDF files etc)

When you run your cursor over the images you will see that it is shredded into bands.

Draw an imaginary box around one of the images to select it and click group at the bottom right corner

then go to Tools on the very top tool bar and from the drop down menu select convert to picture
 Accept the default settings
in the pop out box and your image will be converted into a picture file on the
work space and you will now see the cut out studio button on the tool bar is
available which was not there before.
Accept the default settings
in the pop out box and your image will be converted into a picture file on the
work space and you will now see the cut out studio button on the tool bar is
available which was not there before.
When you run your cursor over the images you will see that it is shredded into bands.
Draw an imaginary box around one of the images to select it and click group at the bottom right corner
then go to Tools on the very top tool bar and from the drop down menu select convert to picture
Now proceed as above (cut out image then click ok)

and now you have a complete image to use and save as you wish!
I hope all that makes sense and de mystifies importing PDFs into your CAP to work with! (part one involving CD images is here if you missed it)
At this point I have to say please use your common sense and adhere to any copyright and angel policies linked to the images you intend to use. They all still stand as stated by each company even though CAP enables you to use them in different ways, it is just a tool and content remains the property of each individual designer but I know you all know that anyway ;)
Well that's all from me for this tutorial, I will put some more together soon ;) Thanks for popping by I hope you are well and happy and as ever, until soon
Happy Crafting
Love
MJM x
Very helpful and useful - thanks a lot!
ReplyDeleteI love your tutorials. They are so easy to follow xx
ReplyDeleteThank you this will help me a lot. Is part one on your blog or can you please send me a link
ReplyDeleteHi Maggie glad its useful, click on the link in this post to get to the first one or just scroll down from the blog home page it was the post just before this one M x
DeleteHave been trying for long enough to do both these things Michelle thank you,
ReplyDeletewill let you know when i succeed, afternoon of play now thanks.
hope you now feel better x
Hi Michelle
ReplyDeleteAfter all this time I found what I was looking for I knew you had given these instructions before but for the life of me could not find what I was looking for many thanks for keeping this post up for me to find it has sorted a big problem out for me on craftartist I really miss the daisy trail that was my first port of call if I had a problem but sadly no more thanks again
Best regards Debbie